Git Commands: 101


git config
Setup author name and mail to be used for all commits in current repository, Devs commonly use --global flag to set config options for current user.
git config --global user.name "username"
git config --global user.email "[email protected]"
git clone
Clone the remote repository with HTTPS or with SSH. This should create a new child directory for the project sources.
git clone <REPO CLONE URL>
git status
Shows the status of your current branch. It will tell you which files you have modified, which files are stages for commit and which files are not. It will also let you know if your local branch is behind, or not up to date with, its remote tracking branch. This command is particularly useful in combination with git add when you only want to commit certain files.
git branch
Create a branch, or show a list of local or remote branches. With git branch, you can add options to do branch-related things:
git branch new-branch-name : Create a branch off of the current branch named "new-branch-name"
-d or --delete : Delete a branch. e.g. git branch -d feature-branch-name
-D : Force delete a branch. This is used when you want to delete a branch that has changes that weren't pushed to the server or merged. e.g. git branch -D feature-branch-name
-a or --all : Display all local and remote-tracking branches.
git fetch
Fetches branches from the server, along with their history and information. You can also use git fetch origin to update your remote-tracking branches.
git pull
Update your working directory by performing a git fetch, followed by a git merge. This is useful if you want to bring your branch up to date with the remote-tracking branch.
You can also use the --rebase option to perform a rebase rather than a merge.
git checkout
This command has a few functions. It can be used to create a new branch off of the current branch, it can be used to checkout a branch from the server, or switch to another branch.
git checkout develop : you will use this a lot. It will switch you from whatever branch you are currently in to the develop branch. If you have changes in your current branch, you will need to either stash them or undo your changes before you switch branches
git checkout branch-on-server : If you want to work on another persons branch (assuming they already pushed their branch to the remote repository), you can use this command to create a copy of the branch on your local machine. You will need to do git fetch first to grab the information about the branch.
git checkout -b new-branch-name : create a new branch off of the current branch and switch to that branch. If you are in develop, this will create a new branch from develop. This command is synonymous to git branch new-branch-name && git checkout new-branch-name
git add
You made changes to your branch, and you want to stage your changes for committing. You will need to add them to what is known as the index. Here are two ways to do this:
git add /filepath/file.f : this will add the single file
git add . : this will add all the changed files. Be careful here; make sure you aren't adding unwanted changes by reviewing your changes using git status. If you accidentally staged unwanted files, take a look at git reset described below.
git commit
You want to make a commit! Awesome! Here's how you do it:
git commit : This will make a commit of the files you have staged using git add, and will open a VIM editor (or whichever editor you have configured in your .gitconfig) to enter your commit message
git commit -a : This will make a commit and add all changed files, and will open an editor to enter your commit message. This is the same as doing git add . && git commit
git commit -m "commit message" : Skip the editor and put your entire message in the command line
git commit -a -m "commit message" : Combine them all! Fab
git commit --amend
git push
Once you make a commit, you will need to push your changes to the server to make it visible to the world. Once you push, your branch and commit(s) will be visible to others.
git push branch-name or git push origin HEAD : Push your branch upstream. You can use either version; using origin HEAD is simply a more verbose way of pushing. It signifies you are pushing the tip (HEAD) your branch to the same name on the remote origin
git push origin -f branch-name or git push origin +branch-name :
❗ ❗ ❗ BE CAREFUL: This is a potentially scary command, and you should only use it if you really know what you are doing. It will overwrite the branch you specified on the remote repository with your local copy of the branch. ❗ ❗ ❗
git log
Show the history of all branches and their commits. Useful for seeing the most recent commit and getting commit hashes.
git log : Show all commits on this branch, along with the commit hash, author, date and message
git log --oneline : Show a simplified version of the above command, showing only the commit hash and commit message
git log --graph : Show a graph of the commit history for your branch.
git log --max-count <n> : Limit the number of commits shown
git log --oneline --graph --max-count 50 : Combined them all! Woo
git rebase
Rebasing is a bit more advanced, but incredibly useful when you need it. When you perform a rebase, you are changing the base of your branch. In essence, a rebase will look at each commit on your branch and update the code to make it seem like you've been working off the new base all along. Sometimes, a rebase will barf if it encounters a situation in which it tries to update a piece of code that you have already modified. In this case, it doesn't know which version of the code to use, so it leaves it to you to resolve them manually. Although they have similar uses, a rebase differs from a merge in that a rebase updates your branch by tweaking each commit, and merge will update your branch by creating a new commit at the tip of your branch. Usually, there are standards and practices employed in a project or team around which method is preferred. Have a discussion with your team about which workflow they prefer.
git stash
Stashing allows you to save your current unstaged changes and bring your branch back to an unmodified state. When you stash, your changes are pushed onto a stack. This is especially useful if you need to quickly switch to another branch without having to commit your incomplete changes.
git stash : stash your unstaged changes
git stash pop: unstash your changes
git stash drop : drop your stashed changes. Careful, you will lose your changes
git stash push <path> : stash a single file
git stash -m <message>: add a message to your stash
git reset
Git reset is used to unstage files or remove commits. It does so by changing what the tip of the branch (HEAD) points to. Three trees are affected by a reset:
HEAD: the tip of your branch
Index: the staging area, which is like a proposed commit
Working Directory: the files currently on your disk There are three reset modes: --soft, --mixed (default), and --hard:
--soft : This is the very first step in any reset mode. For a soft reset,
--mixed :
--hard :
Undo git add
git add .
git reset -- file.html (unstage single file, or)
git reset (to unstage all)
Undo most recent commit
git commit -a -m "commit message"
git reset --soft HEAD^ (undo commit that is at the tip of the branch)
git commit -a -m "new commit message"
Undo a commit permanently
git reset --hard HEAD~2 : Destroy the last two commits, i.e. HEAD and HEAD^
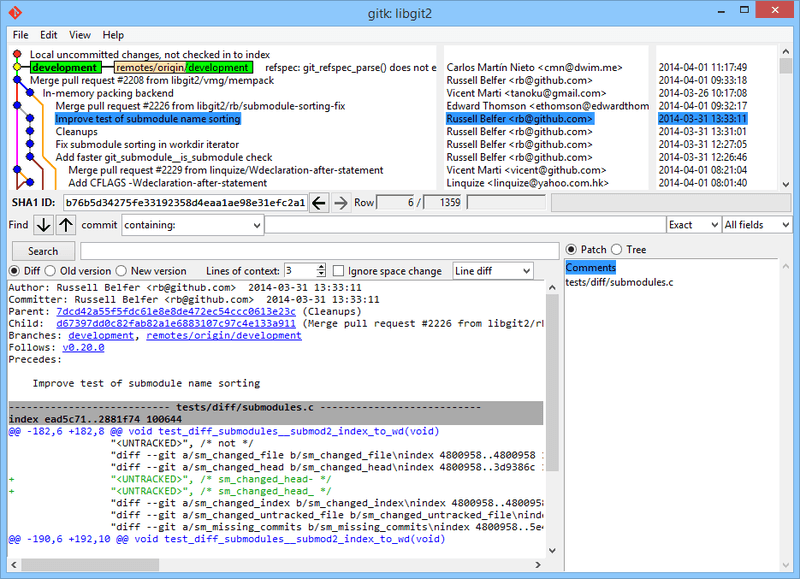
#gitk
Gitk is a graphical repository browser. It was the first of its kind. It can be thought of as a GUI wrapper for git log . It is useful for exploring and visualizing the history of a repository. It's written in tcl/tk which makes it portable across operating systems.
Displays changes in a repository or a selected set of commits. This includes visualizing the commit graph, showing information related to each commit, and the files in the trees of each revision.